Witch Hat Cookies are a delightful treat that can elevate any Halloween gathering. Picture this: chocolate-dipped cookies shaped like whimsical witch hats, adorned with a colorful candy belt. They’re not just delicious, they’re a feast for the eyes too. Whether you’re hosting a spooky soiree or looking for a fun baking activity with the kids, these cookies will cast a sweet spell on everyone who tries them! Let’s dive into the world of baking and uncover how to create these enchanting treats right in your own kitchen.
Print
Witch Hat Cookies
- Total Time: 30 minutes
- Yield: 24 cookies 1x
Description
Delightful chocolate-dipped cookies shaped like whimsical witch hats, perfect for Halloween gatherings.
Ingredients
- 1 cup unsalted butter, softened
- 1 cup granulated sugar
- 2 large eggs
- 1 teaspoon vanilla extract
- 2 1/2 cups all-purpose flour
- 1 teaspoon baking powder
- 1/2 teaspoon salt
- 1/2 cup unsweetened cocoa powder
- 1 cup chocolate chips (semisweet or dark)
- 1 cup candy corn
- Edible decorations (sprinkles or colored sugar, optional)
Instructions
- Preheat your oven to 350°F (175°C).
- Cream together the softened butter and sugar until light and fluffy.
- Add the eggs, one at a time, along with the vanilla extract.
- Whisk together the flour, cocoa powder, baking powder, and salt in a separate bowl.
- Fold this dry mixture into the wet ingredients.
- Scoop tablespoon-sized balls of dough onto a baking sheet lined with parchment paper.
- Bake for about 10-12 minutes.
- Remove from the oven and let cool for about 5 minutes on the baking sheet.
- Melt the chocolate chips in a microwave-safe bowl.
- Dip the tip of each cookie into the melted chocolate and place a candy corn piece on top.
- Drizzle extra chocolate over the cookie and add sprinkles if desired.
Notes
Consider healthier alternatives like using whole wheat flour or reducing the sugar for a lighter version.
- Prep Time: 15 minutes
- Cook Time: 12 minutes
- Category: Dessert
- Method: Baking
- Cuisine: American
Nutrition
- Serving Size: 1 cookie
- Calories: 150
- Sugar: 10g
- Sodium: 70mg
- Fat: 8g
- Saturated Fat: 4g
- Unsaturated Fat: 3g
- Trans Fat: 0g
- Carbohydrates: 19g
- Fiber: 1g
- Protein: 2g
- Cholesterol: 20mg
Ingredients
To create your very own Witch Hat Cookies, gather the following ingredients:
For the Cookies:
- 1 cup unsalted butter, softened
- 1 cup granulated sugar
- 2 large eggs
- 1 teaspoon vanilla extract
- 2 ½ cups all-purpose flour
- 1 teaspoon baking powder
- ½ teaspoon salt
- ½ cup unsweetened cocoa powder
For Decorating:
- 1 cup chocolate chips (semisweet or dark)
- 1 cup candy corn
- Edible decorations (sprinkles or colored sugar, optional)
Substitutions and Optional Ingredients:
- Use almond flour for a gluten-free version; just adjust the liquid.
- Turkey bacon can substitute any traditional bacon used in a candy belt, keeping it light and delightful.
- Dairy-free margarine can replace butter for a vegan option.
- Instead of candy corn, use any mini chocolates or fruit-flavored candies for different aesthetics.
Timing
When it comes to baking, timing is key! Here’s a quick run-down:
- Prep Time: 15 minutes
- Cooking Time: 10-12 minutes
- Total Time: About 30 minutes, including cooling time.
This recipe is quick enough to whip up on a busy Halloween evening, and the results are sure to impress.
How to Make Witch Hat Cookies
Step 1: Preheat your oven to 350°F (175°C). This is a crucial start; the cookies need to bake perfectly, and a well-prepped oven is essential for that.
Step 2: In a mixing bowl, cream together the softened butter and sugar until the mixture is light and fluffy. This might take around 2-3 minutes with a handheld mixer. Beating it well helps create a lighter texture, so don’t skimp on this step.
Step 3: Gradually add in the eggs, one at a time, along with the vanilla extract. Mix until everything is well incorporated, creating a rich, creamy base for your cookies.
Step 4: In a separate bowl, whisk together the flour, cocoa powder, baking powder, and salt. Gradually fold this dry mixture into the wet ingredients. Take it slow to avoid a flour cloud explosion!
Step 5: Once combined, scoop tablespoon-sized balls of dough onto a baking sheet lined with parchment paper. Leave some space between them since they will spread during baking.
Step 6: Bake in the preheated oven for about 10-12 minutes. Watch them closely; you’ll know they’re done when the edges start to become firm but the centers appear soft.
Step 7: Remove from the oven and allow the cookies to cool on the baking sheet for about 5 minutes before transferring them to a wire rack to cool completely.
Step 8: While the cookies cool, melt the chocolate chips in a microwave-safe bowl, heating in 30-second increments and stirring in between until smooth and melted.
Step 9: To assemble, dip the tip of each cookie into the melted chocolate, and then place a candy corn piece on top while the chocolate is still wet. This gives the appearance of a witch’s hat.
Step 10: For added flair, drizzle extra chocolate over the cookie and add sprinkles if desired. Allow the chocolate to set before serving or eating.
Healthier Alternatives if Needed
If you want to make Witch Hat Cookies a bit healthier, here’s how you can modify the recipe:
- Reduce Sugar: Use a sugar substitute or reduce the granulated sugar slightly to cut down on sweetness.
- Whole Wheat Flour: Substitute half the all-purpose flour with whole wheat flour for more fiber.
- Agave or Honey: Instead of granulated sugar, using agave syrup or honey can provide a more natural sweetness, just be cautious as it alters the wet-to-dry ratio slightly.
Serving Suggestions
For those looking to create the perfect presentation, consider these serving ideas:
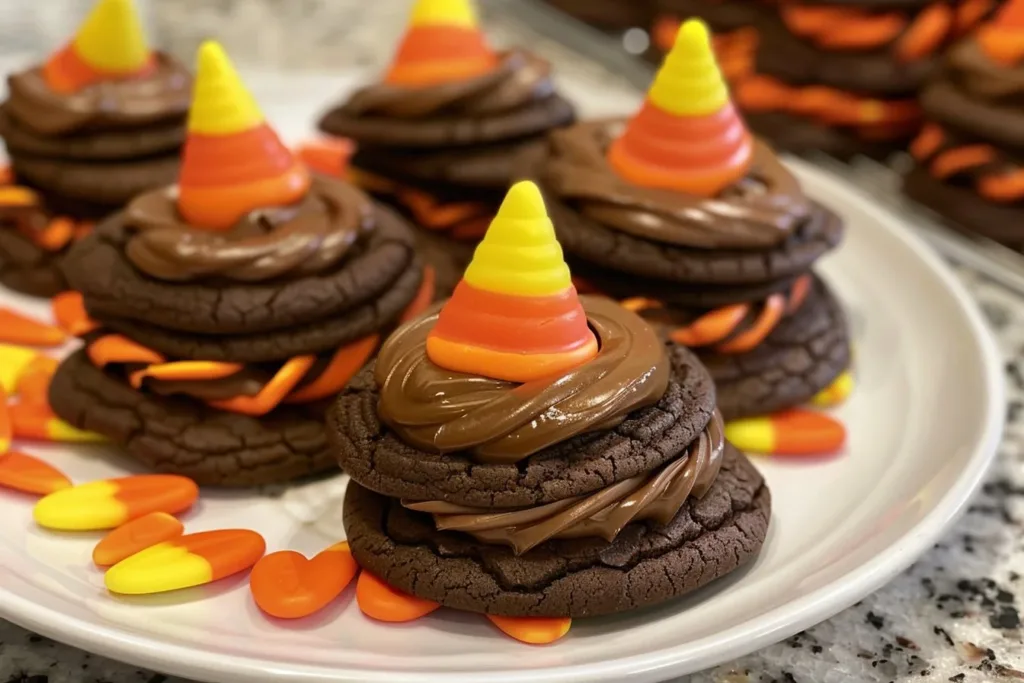
- Serve Witch Hat Cookies on a spooky-themed plate, surrounded by artificial spider webs and plastic spiders for that extra Halloween touch.
- Pair with a glass of warm apple cider or a refreshing pumpkin spice latte to complement the treats. You could also try a Halloween punch for a festive drink option.
- Arrange the cookies on a tiered display for parties, so they stand out and catch the eye of your guests.
Common Mistakes to Avoid
Baking can be tricky, but here are some common pitfalls and how to steer clear of them:
- Not Softening Butter: Always ensure your butter is soft before mixing. Cold butter can lead to dense cookies.
- Overbaking: Everyone loves a cookie with a soft center, so keep a close eye on them to avoid becoming tough. Remove them while they’re still slightly soft in the middle.
- Skipping Cooling Time: Allowing cookies to cool on the baking sheet helps them firm up without breaking apart. Don’t rush this!
Storage Tips
After devouring your delicious Witch Hat Cookies, here’s how to store the leftovers:
- Refrigerator: Store in an airtight container for up to one week. They can last a bit longer if layered with parchment paper to avoid sticking.
- Freezer: You can freeze these cookies for up to three months. Just ensure they’re in an airtight container to avoid freezer burn.
- Reheating: If you want to enjoy them warm again, pop them in the microwave for about 10 seconds, or reheat in a preheated oven set to 300°F (150°C) for a few minutes.
Frequently Asked Questions
How can I make these cookies gluten-free?
Simply substitute all-purpose flour with a 1:1 gluten-free flour blend, ensuring all other ingredients are gluten-free as well.
Can I use colored chocolate melts instead of regular chocolate?
Absolutely! Colored chocolate melts will not only maintain taste but also enhance the visual appeal of your Witch Hat Cookies.
Can I prepare the dough in advance?
Yes, you can refrigerate the dough for up to 48 hours before baking. Just make sure to let it sit at room temperature for a few minutes before scooping and baking.
What toppings can I add instead of candy corn?
Feel free to get creative! Mini chocolate bars, gummy candies, or even pretzel sticks make for fun alternatives.
How do I prevent the cookies from spreading too much?
Chilling the dough for at least 30 minutes before baking can help maintain their shape during the cooking process.
Conclusion
Witch Hat Cookies are not just fun to make; they’re a fantastic way to get into the Halloween spirit! With their charming design and rich flavor, they’re bound to be a hit at any gathering. So, why not gather your ingredients and whip up a batch? We guarantee that these cookies will bewitch your friends and family, making your Halloween festivities even sweeter. Don’t forget to check out our other related recipes to keep the spooky season rolling!